
This post may contain affiliate links. Please read our disclosure policy.
Achieving the perfect texture and flavor in gluten-free baking can often feel like a culinary quest, but for those seeking the sweet, tropical essence of Hawaiian rolls without the gluten, a groundbreaking recipe offers a beacon of hope. These extra soft, tender gluten-free Hawaiian rolls deliver a subtly sweet, tropical flavor profile that is remarkably versatile, making them an ideal accompaniment to savory sandwich fillings or as a delightful side to any meal. The meticulous attention to detail in their preparation, from the careful selection of ingredients to the precise baking techniques, ensures a delightful outcome that rivals their traditional counterparts.
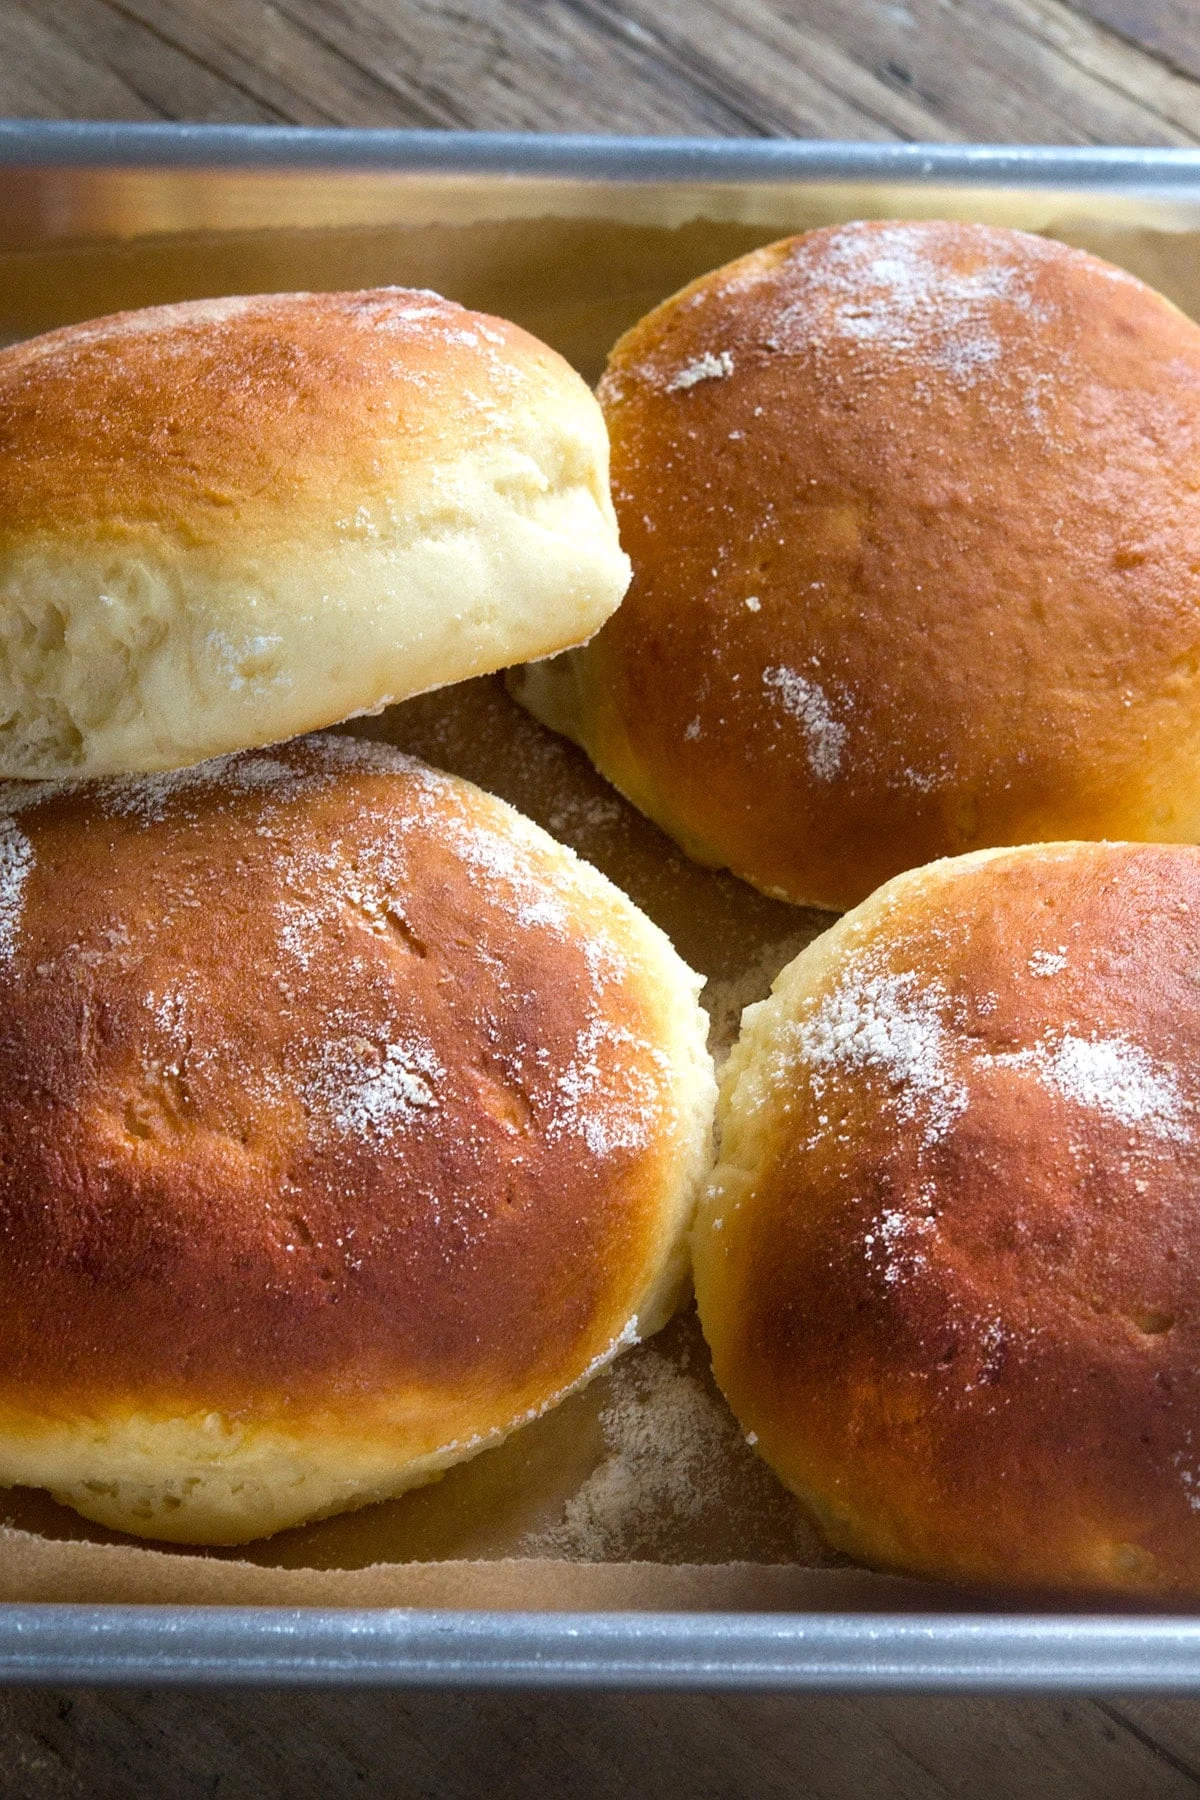
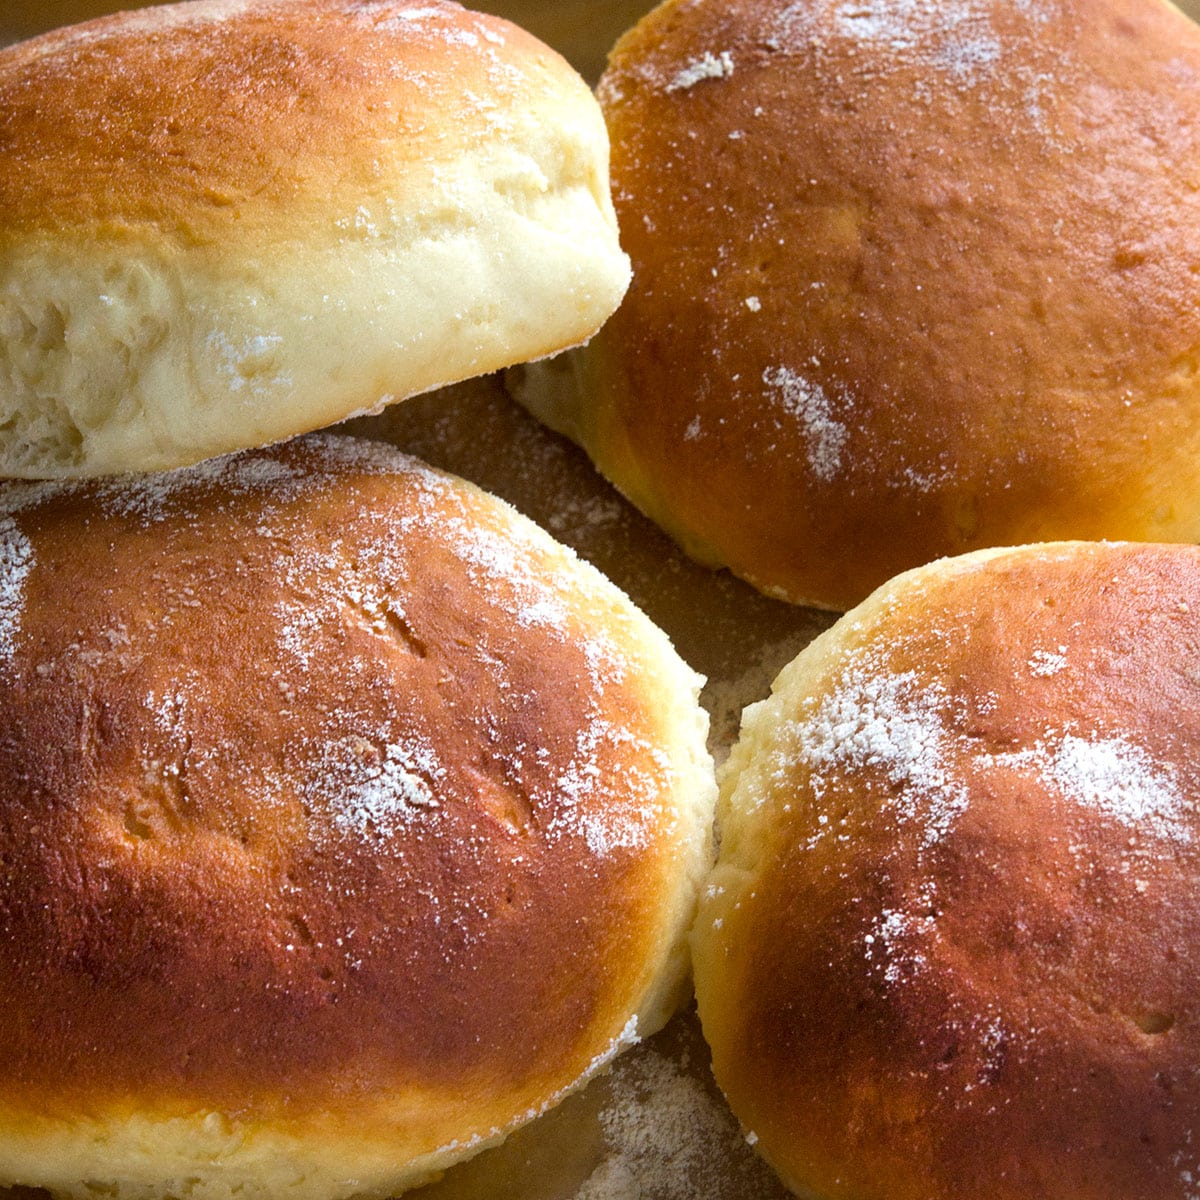
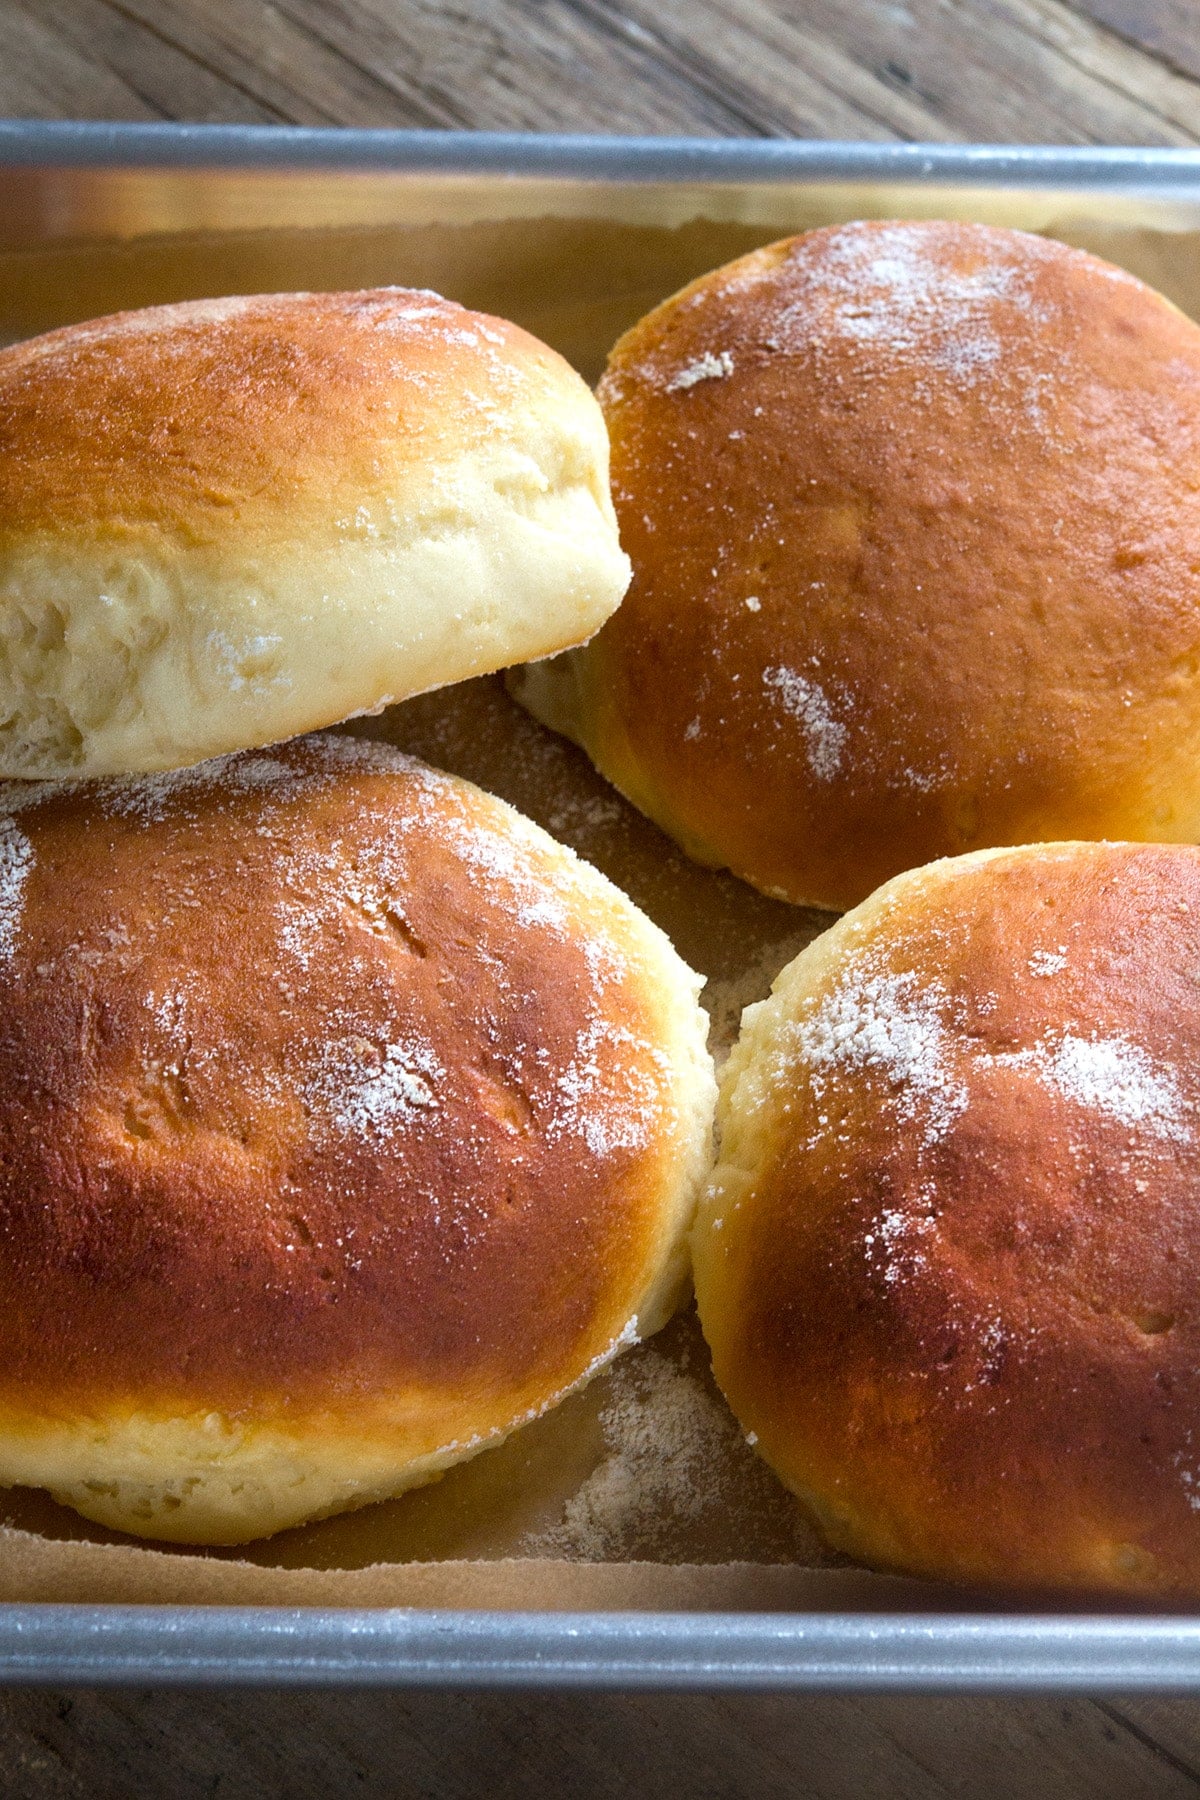
A key element contributing to the success of these rolls is the generous egg wash applied before baking. This not only contributes to a deeply golden-brown exterior but also plays a crucial role in retaining moisture within the dough. As the rolls cool, this egg wash forms a super-thin, yet beautifully shiny, crust that provides a delightful textural contrast to the soft interior. This thoughtful application of culinary science transforms simple ingredients into a gourmet experience, showcasing the potential of gluten-free baking to achieve exceptional results.
The Science Behind the Softness: Why This Recipe Excels
The success of these gluten-free Hawaiian rolls can be attributed to a strategic combination of ingredients and techniques designed to mimic the desirable qualities of traditional wheat-based rolls. The recipe prominently features pineapple juice, a key ingredient that imparts a unique, lightly sweet, tropical, and subtly tangy flavor. This tropical foundation is further enriched with butter, an egg, and a touch of sugar, all of which contribute to an incredibly tender, pillow-soft crumb. The result is a roll that not only boasts superior texture but also achieves a deep golden-brown hue during baking, a testament to the careful balance of its components.
Furthermore, the recipe provides guidance on achieving perfectly uniform rolls, offering two distinct shaping options. The first involves shaping the dough into eight full-size rounds, perfect for use as sandwich buns. Alternatively, the dough can be divided into twelve equal pieces, shaped into classic rounds rather than flattened disks, and served as delectable savory-sweet gluten-free dinner rolls. This adaptability allows bakers to tailor the rolls to their specific culinary needs and preferences, further enhancing the recipe’s appeal.
Essential Ingredients for Gluten-Free Hawaiian Roll Perfection
Crafting these exceptional gluten-free Hawaiian rolls requires a specific set of ingredients, each playing a vital role in achieving the desired outcome. Understanding the function of each component can empower bakers to troubleshoot and adapt the recipe as needed.
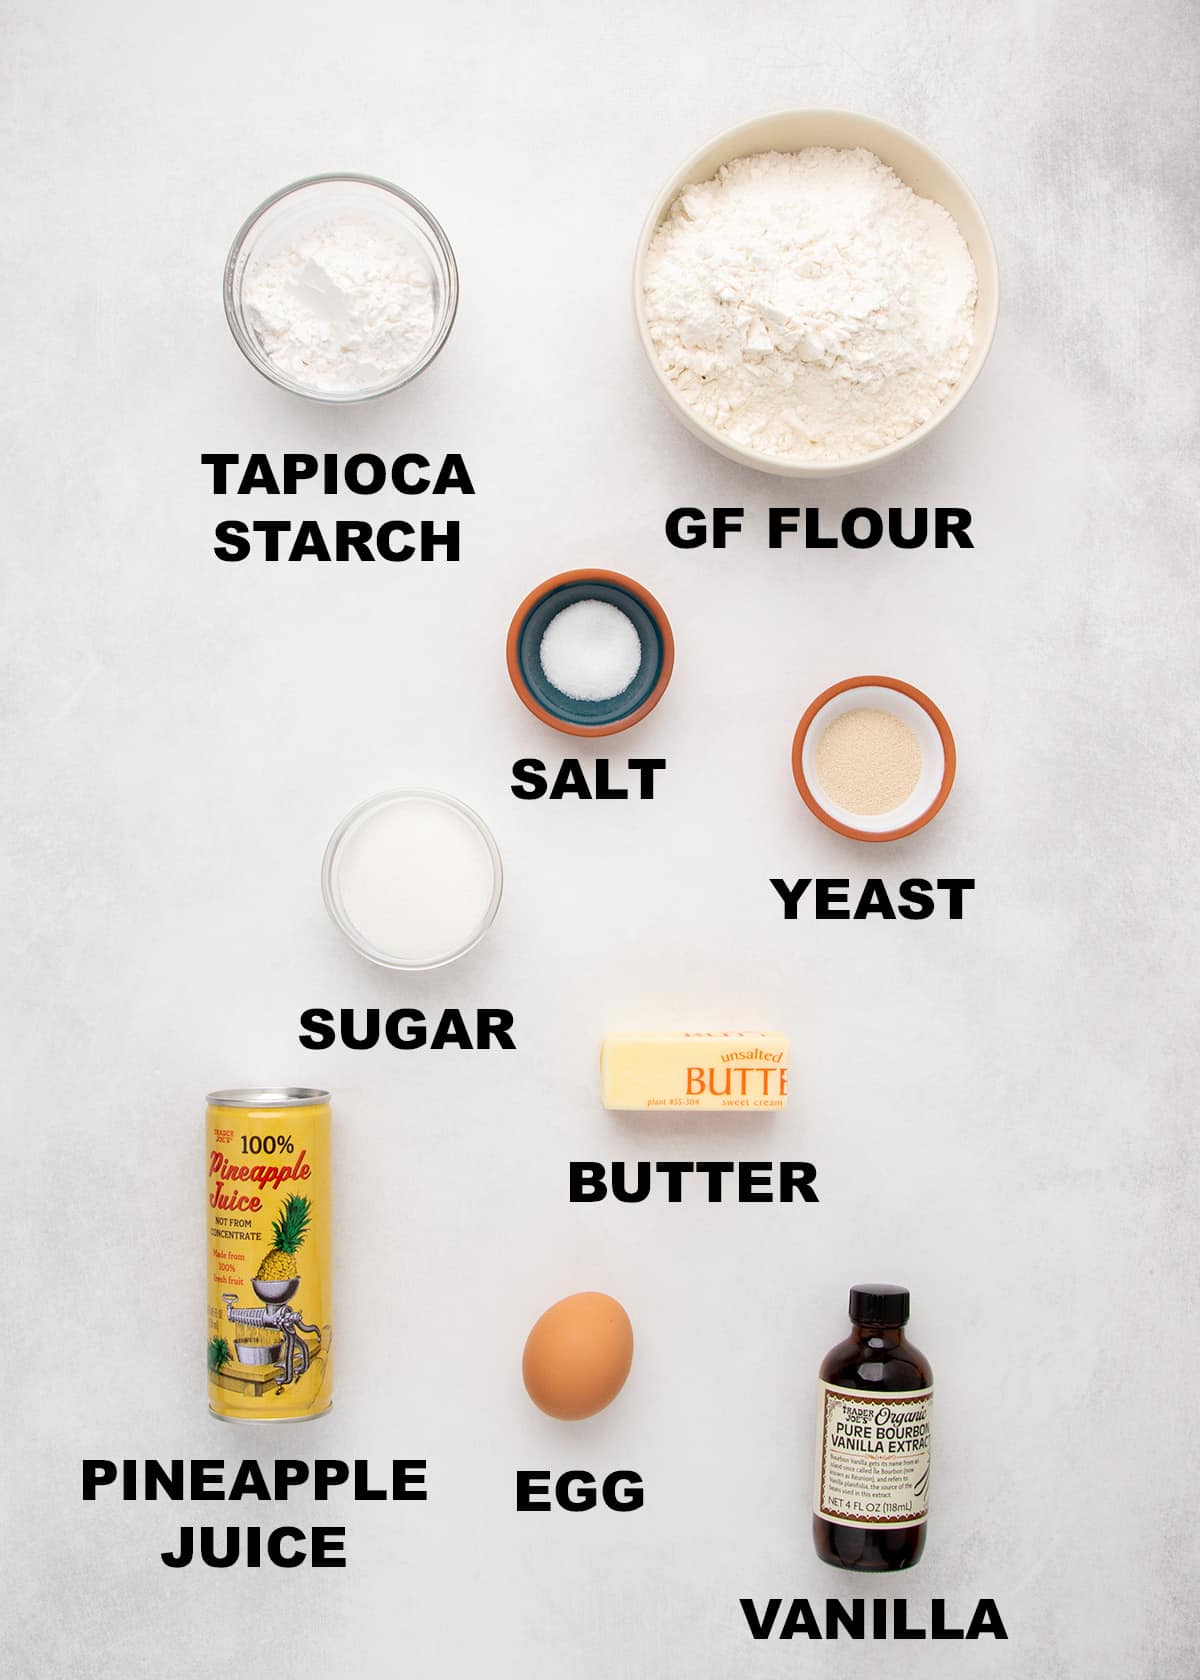
- Gluten-Free Flour Blend: The foundation of any gluten-free baked good, the quality and composition of the flour blend are paramount. A well-balanced blend, typically including rice flour, tapioca starch, potato starch, and often a binder like xanthan gum, is crucial for providing structure and mimicking the elasticity of gluten. The original article specifically recommends blends like Nicole’s Best multipurpose gluten-free flour blend, Vitacost’s Multi-Blend Gluten Free Flour with added xanthan gum, or Better Batter’s original all-purpose blend without additional xanthan gum. The author stresses that poorly balanced blends will not yield successful shaped yeast bread.
- Xanthan Gum: This essential ingredient acts as a binder in gluten-free baking, compensating for the absence of gluten’s elastic properties. It helps to hold the dough together, improve its texture, and prevent it from crumbling.
- Tapioca Starch: This starch contributes to the tenderness and chewiness of the rolls, providing a light and airy texture.
- Yeast: Active dry yeast or instant yeast is responsible for the leavening process, enabling the dough to rise and creating the characteristic airy interior of bread.
- Sugar: Granulated sugar not only adds sweetness but also feeds the yeast, aiding in its activation and promoting a better rise. It also contributes to browning and tenderness.
- Salt: Salt is a crucial flavor enhancer in bread, balancing the sweetness and adding depth to the overall taste profile. It also plays a role in controlling yeast activity.
- Butter: Unsalted butter contributes richness, tenderness, and a subtle flavor to the rolls. Using room temperature butter ensures it incorporates smoothly into the dough.
- Egg: An egg provides richness, acts as a binder, and contributes to the color and structure of the rolls. It also helps create a glossy finish when used in the egg wash.
- Pineapple Juice: This is the star ingredient that defines the Hawaiian flavor. Its natural sugars and enzymes contribute to tenderness and a unique tropical sweetness. It’s crucial that the pineapple juice is at room temperature to ensure proper emulsification with other ingredients.
- Vanilla Extract: A touch of vanilla extract enhances the overall flavor profile, adding a warm, aromatic note that complements the tropical sweetness.
A Step-by-Step Journey to Gluten-Free Hawaiian Rolls
The process of creating these gluten-free Hawaiian rolls is a methodical one, designed to yield a superior product. The author emphasizes a visual guide, offering detailed instructions for each stage of preparation.
Crafting the Dough Base: Combining Dry and Wet Ingredients
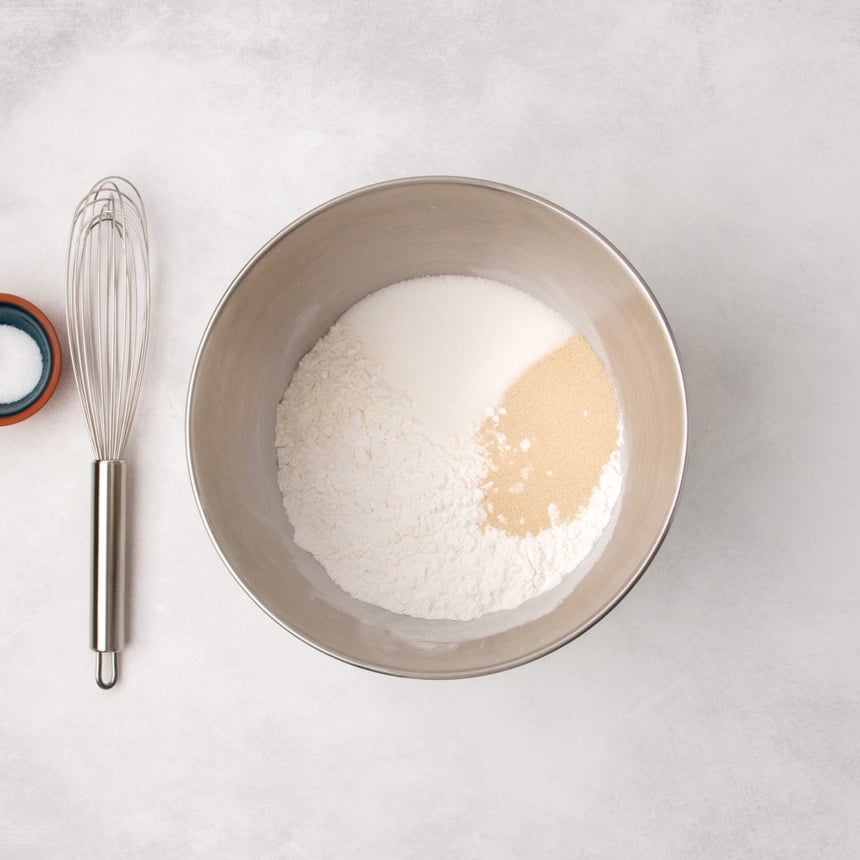
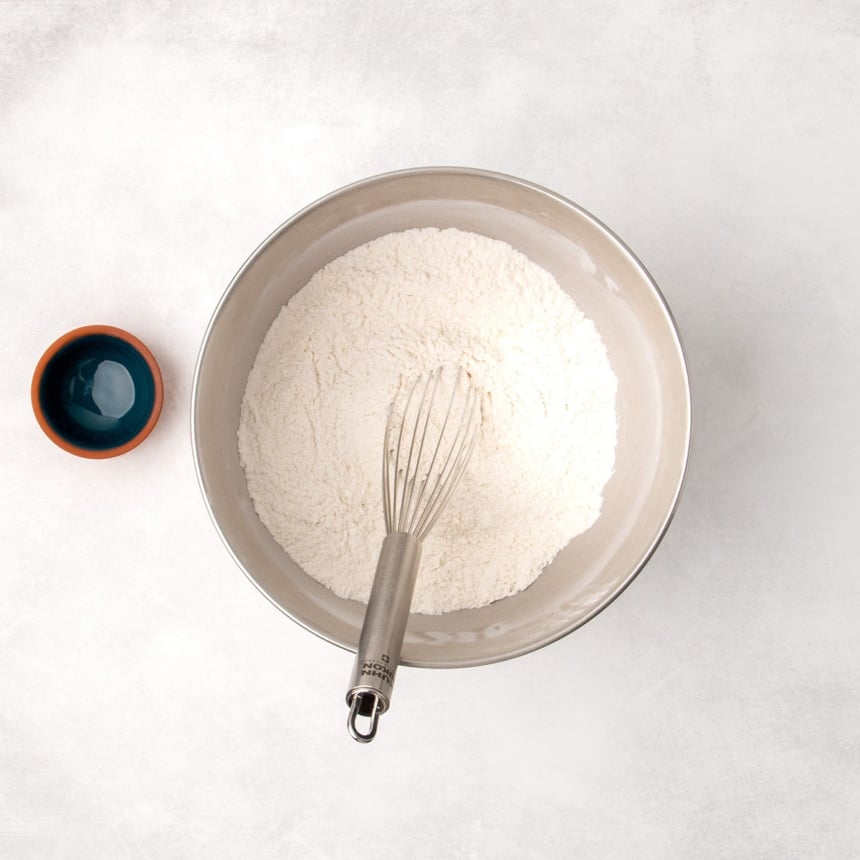
The initial step involves meticulously combining the dry ingredients in the bowl of a stand mixer. This includes the gluten-free flour blend, tapioca starch, yeast, and sugar. Crucially, the salt is whisked in separately to prevent it from coming into direct contact with the yeast, as salt can inhibit yeast activity.
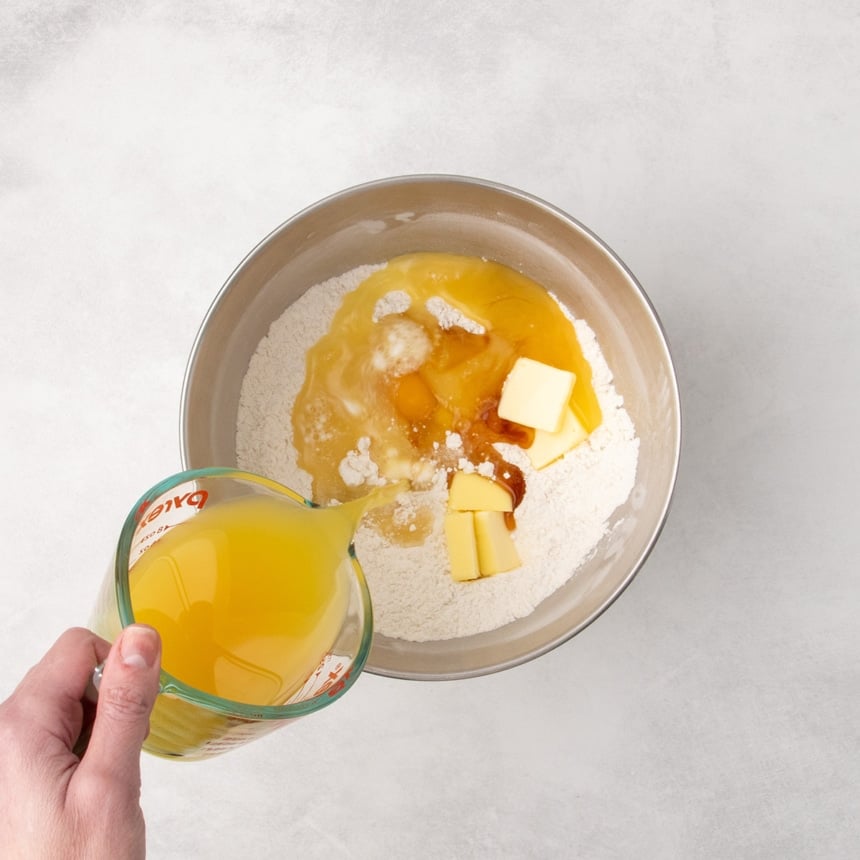
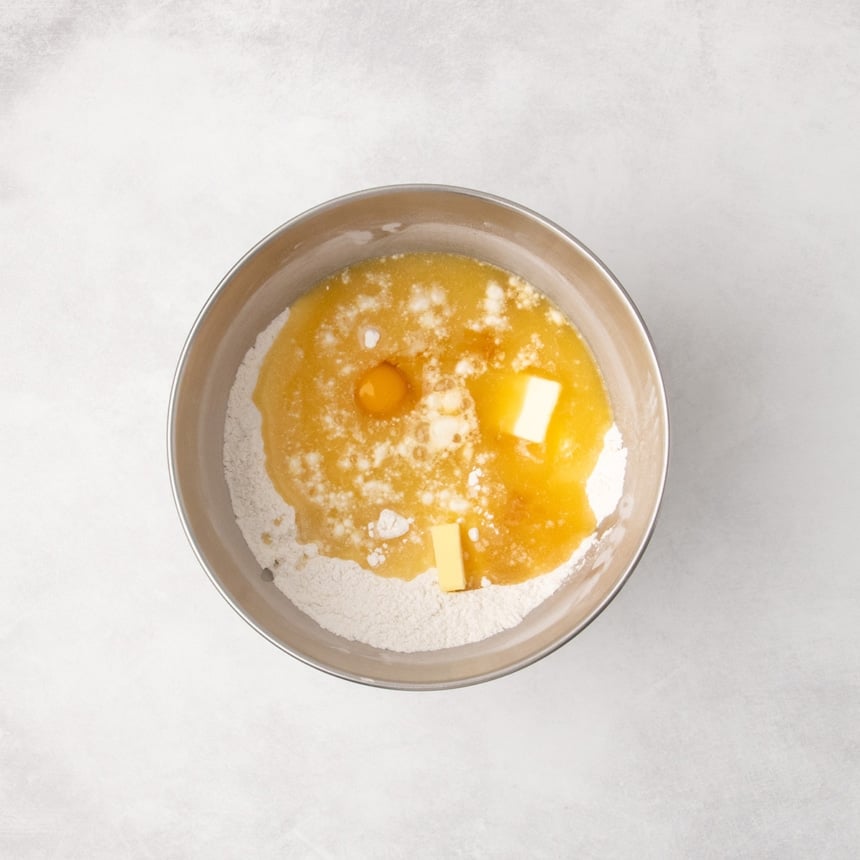
Following the incorporation of dry ingredients, the wet components are introduced. This includes softened butter, an egg, vanilla extract, and pineapple juice. It is imperative that all wet ingredients are at room temperature. This ensures that the butter melts and emulsifies seamlessly with the other liquids, preventing the formation of undesirable clumps. Cold liquids can cause softened butter to seize, compromising the texture of the dough.
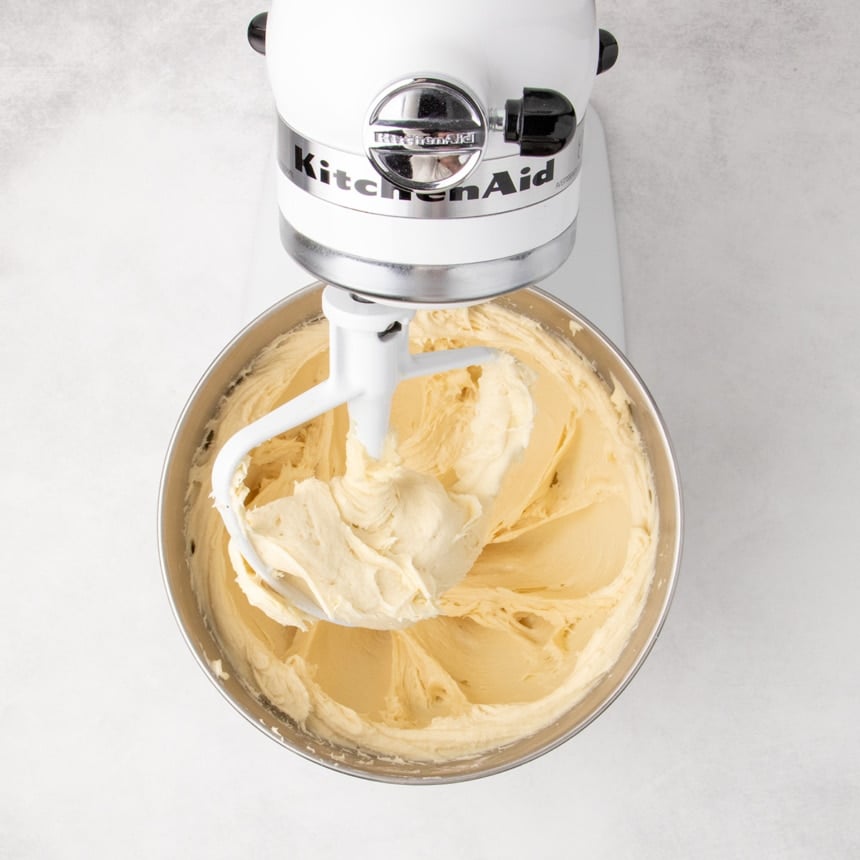
The Art of Mixing: Developing the Dough’s Structure
Once the ingredients are combined, the paddle attachment is fitted to the stand mixer. The mixing process begins on low speed to ensure that the dry ingredients are fully moistened without excessive loss of dough from the bowl. The speed is then increased to medium, and the dough is beaten until it achieves a whipped appearance. This aeration process is vital for creating well-rising, less dense rolls, contributing significantly to their characteristic lightness.
The Crucial Cold Rise: Flavor Development and Dough Handling
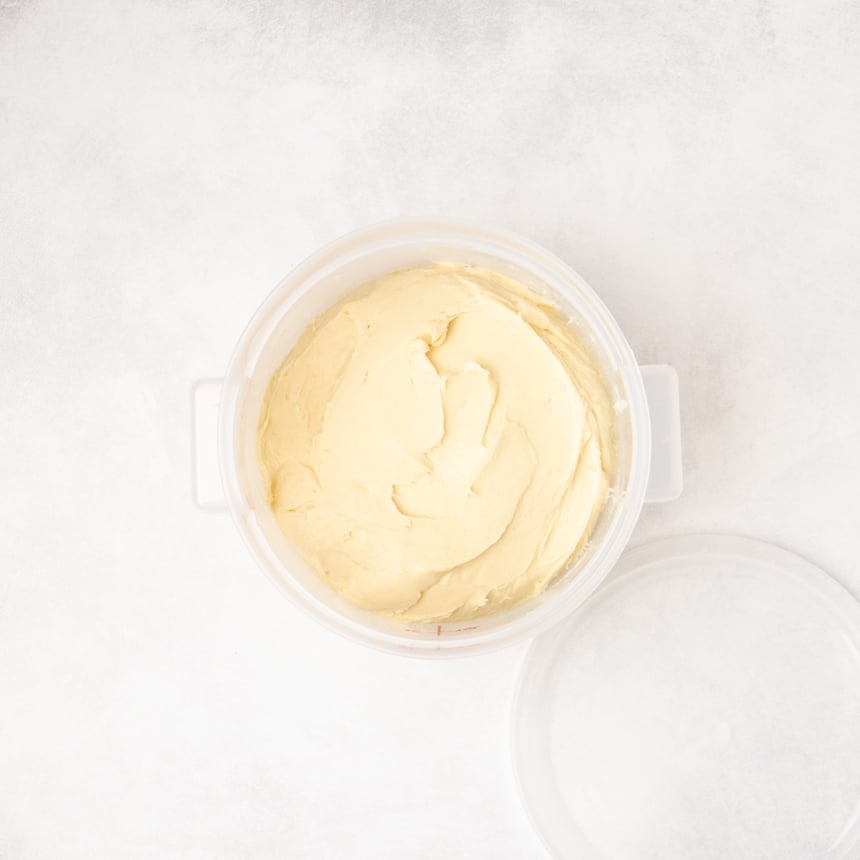
A unique and critical step in this recipe is the extended cold rise. After mixing, the dough is transferred to a lidded container, large enough to accommodate its expansion. The dough is then chilled in the refrigerator for a minimum of 12 hours, and potentially up to 3 days. This extended cold fermentation serves multiple purposes. Primarily, it allows for significant flavor development, as the yeast slowly works, creating complex aromatic compounds. Secondly, this prolonged chilling period enables the dry ingredients to fully absorb the moisture from the liquids. This absorption makes the dough firmer and less sticky, rendering it much easier to handle and shape in the subsequent steps. The author cautions against extending this period beyond three days, as an overly yeasty flavor can develop, and the final rise after shaping might become unpredictable.
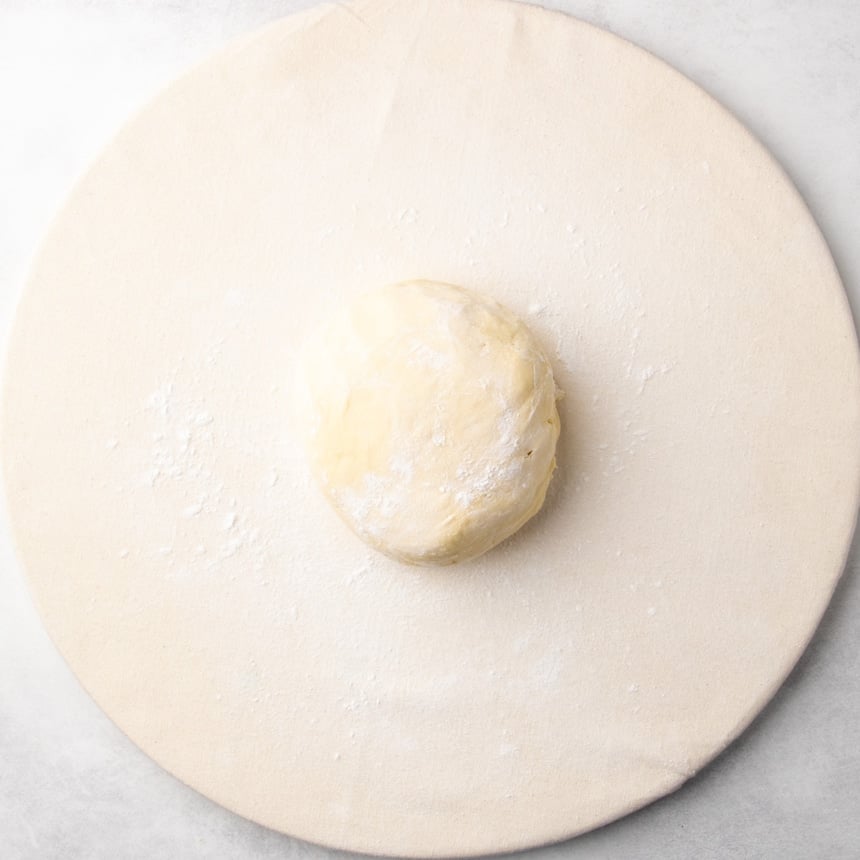
Preparing for Shaping: Bringing the Dough to Workable Consistency
When ready to proceed, the chilled dough is turned out onto a clean surface lightly dusted with tapioca flour. The top of the dough is also dusted, and the dough is gently folded a few times until it is no longer sticky. This process reintroduces a small amount of flour, making the dough manageable for shaping without compromising its delicate texture.
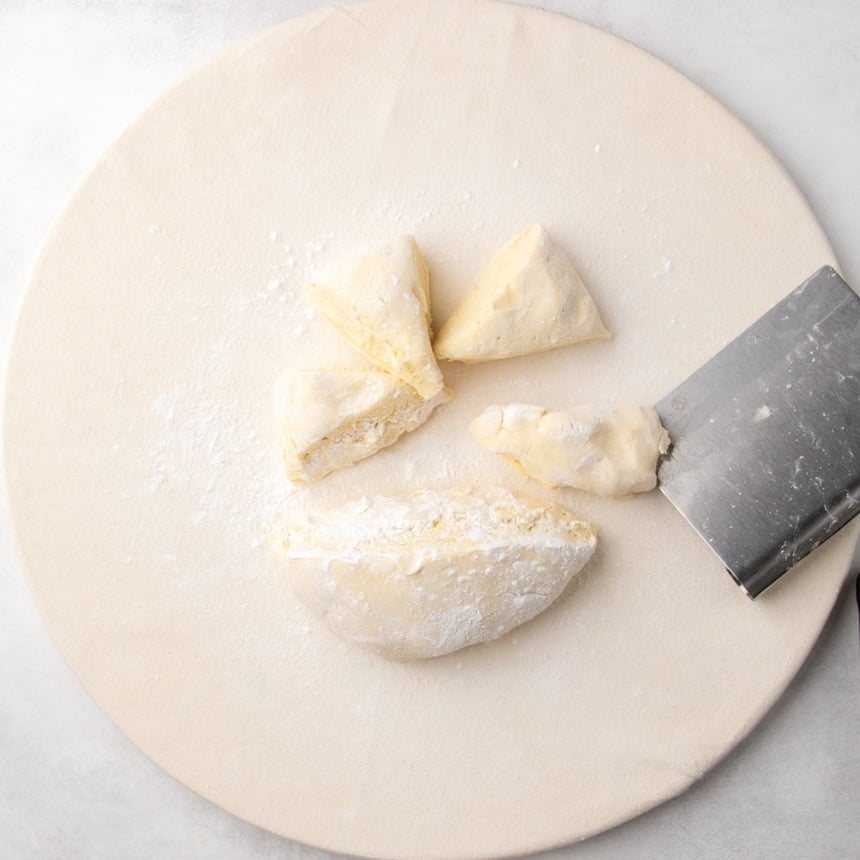
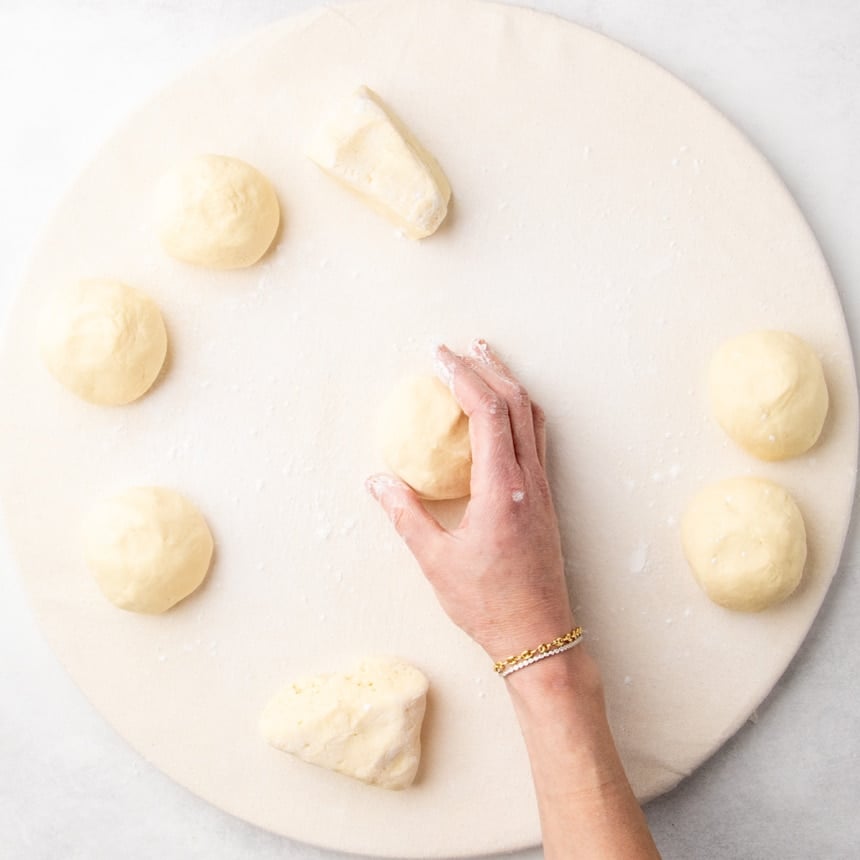
Precision in Portions: Dividing the Dough for Even Baking
The dough is then precisely divided into equal portions. The recipe suggests dividing the entire mass in half, and then each half into four equal parts, yielding a total of eight rolls, each weighing approximately four ounces. This exact division is crucial for ensuring that the rolls rise and bake uniformly, a key factor in achieving consistent results across the batch.
The Gentle Art of Shaping: Coaxing the Perfect Roll
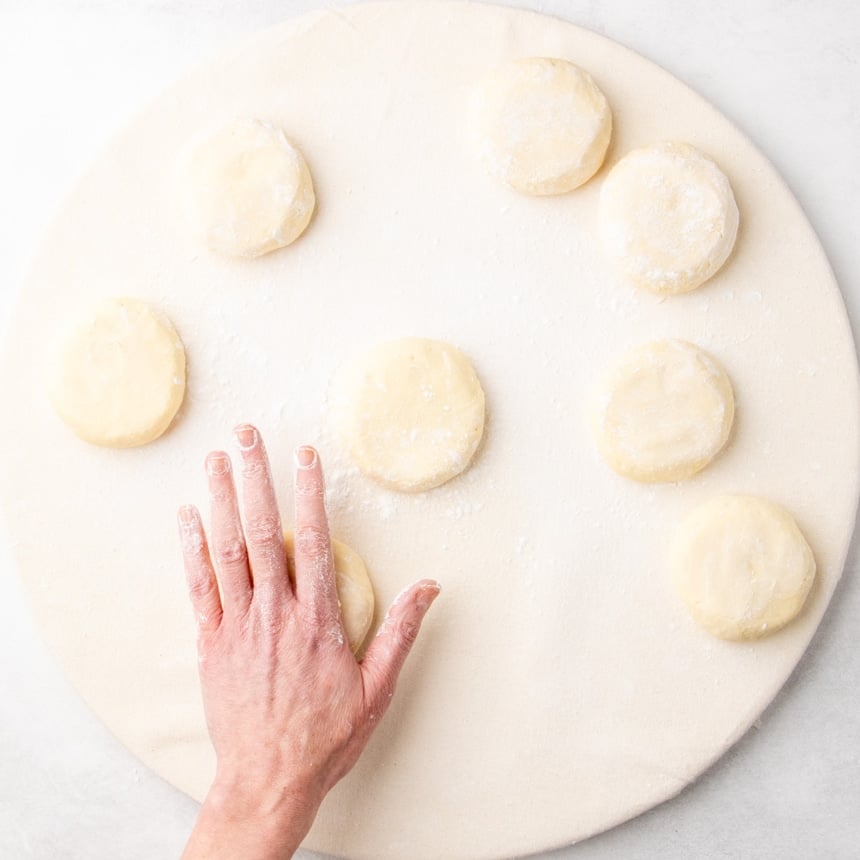
Shaping the individual dough portions requires a delicate touch. The edges of each piece are pulled toward the center and pinched to secure. The dough is then flipped so that the gathered edges are on the bottom. The baker’s palm is cupped around the dough, with the side of the hand nearest the pinky resting on the work surface. This hand position remains constant while the dough is rotated in a tight circle. This motion gently rounds the dough, coaxing the sides upward. Finally, each round is pressed into a flat disk with the palm. This technique creates rolls with a wider base, ideal for their intended use as sandwich buns.
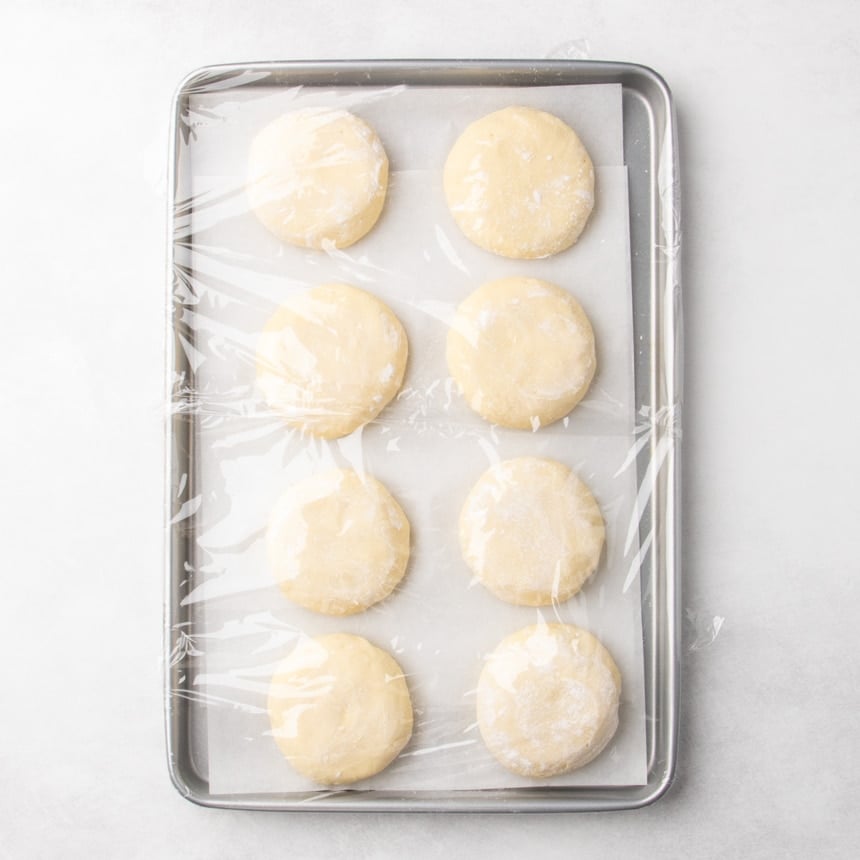
The Second Rise: Allowing the Rolls to Bloom
The shaped rolls are then placed on a parchment-lined baking sheet. They are covered loosely with plastic wrap, ensuring the wrap is secured around the perimeter to maintain adequate moisture for the rise. After approximately 30 minutes, the plastic wrap is removed.
The Glossy Finish: Applying the Egg Wash
Before baking, the rolls are generously brushed with an egg wash. This layer serves a dual purpose: it prevents the rolls from drying out during the final rise and contributes to their appealing golden-brown color and shiny exterior during baking.
The Final Transformation: Baking to Golden Perfection
The uncovered rolls are allowed to finish their rise until they have increased in size by at least 50%. It’s important to note that they will not double in size during this stage. Signs of overproofing, such as dimpling or pockmarked surfaces, indicate that the rolls have reached their optimal rise and should be baked immediately.
The rolls are then baked in a preheated oven at 375°F (190°C). They are considered done when they exhibit a deep golden-brown color all over, appear taut across the top, and register an internal temperature of at least 185°F (85°C) on an instant-read thermometer.
The Gentle Cooling: Preserving the Crust’s Integrity
Immediately after removal from the oven, the hot rolls are loosely covered with a tea towel. This step is essential for trapping moisture, preventing the crust from becoming overly crispy or drying out. This gentle cooling process helps maintain the desired soft texture of the rolls.
Expert Insights for Gluten-Free Baking Success
Beyond the core recipe, several expert tips can elevate the gluten-free Hawaiian roll baking experience.
Understanding the "Cold Rise" Purpose
As highlighted earlier, the initial 12-to-3-day refrigerator period is not solely about volume but about profound flavor development and achieving the right dough consistency. The slow fermentation allows yeast byproducts to mellow, creating a nuanced flavor profile that is both sweet and slightly tangy, characteristic of traditional Hawaiian rolls. The extended chilling also ensures the starches and proteins in the gluten-free flour blend fully hydrate, making the dough less prone to sticking and easier to shape without excessive flour. This is a stark contrast to traditional bread making, where a warm, rapid rise is often prioritized.
The Delicate Touch: Handling the Dough Lightly
The author strongly advises against incorporating too much additional flour during the shaping process. Gluten-free doughs can be more sensitive to over-flouring than their gluten-containing counterparts. Adding excessive flour can lead to dry, dense rolls. The key is to work with the dough while it is still cool from refrigeration, using minimal tapioca flour for dusting and handling the dough primarily with fingertips rather than pressing firmly with palms. Keeping the dough in motion during shaping also helps prevent sticking, reducing the need for extra flour.
Alternatives for Stand Mixer Limitations
For those without a stand mixer, the recipe acknowledges that achieving the proper dough consistency by hand can be challenging. Traditional hand-kneading methods are often insufficient for developing the necessary structure in gluten-free dough. Similarly, handheld mixers with small balloon attachments are not suitable, as they tend to incorporate too much air, leading to an undesirable texture. The article suggests a food processor with its plastic blade as a viable alternative, with the caveat to be mindful of not overprocessing or allowing the dough to overheat. The emulsification and aeration achieved by a stand mixer’s paddle attachment are difficult to replicate without specialized equipment.
Addressing Dietary Considerations: Ingredient Substitutions
For individuals managing specific dietary needs or allergies, this recipe offers flexibility through thoughtful substitutions.
Dairy-Free Adaptation
To make these rolls dairy-free, traditional butter can be replaced with a high-quality block-style vegan butter substitute. Brands such as Melt, Miyoko’s Kitchen, or Trader Joe’s vegan butter are recommended for their comparable texture and fat content, which are crucial for achieving the desired richness and tenderness.
Egg-Free Alternatives
The recipe incorporates a single egg in the dough and an optional egg wash. For an egg-free version, several options exist. In the dough, a chia egg (one tablespoon of chia seeds mixed with three tablespoons of water, allowed to sit for 5-10 minutes), Bob’s Red Mill Egg Replacer, or a commercial liquid egg replacer like JustEgg can be used. For the egg wash, brushing the shaped rolls with a bit of cream or a plant-based milk alternative can provide a similar sheen and browning effect.
Pineapple Juice Variations
While pineapple juice is integral to the characteristic Hawaiian flavor, it can be substituted if necessary. Apple juice offers a similar sweetness but with a milder flavor profile. Alternatively, milk can be used in equal amounts, resulting in a richer, tender roll with a less pronounced sweetness. These substitutions do not necessitate changes to other ingredients in the recipe.
Storage and Preservation of Baked Goods
Once fully cooled, these gluten-free Hawaiian rolls can be stored for optimal freshness. Each roll can be individually wrapped in freezer-safe material and frozen for up to three months. To refresh them after freezing, allow them to defrost at room temperature, lightly sprinkle with water, and then warm them in a microwave or toaster oven. This method helps to restore their soft texture and delightful flavor.
The meticulous approach to ingredients, technique, and even storage underscores the dedication required to master gluten-free baking. This recipe for gluten-free Hawaiian rolls represents a significant achievement, offering a truly satisfying and delicious alternative for those who follow a gluten-free lifestyle. The journey from raw ingredients to a warm, flavorful roll is a testament to the evolving landscape of inclusive and high-quality baked goods.
